Tips for Using SPSS/Windows in W & M PACLab
Good News for SPSS Users: next Fall 2006 W & M PACLab will have Windows/SPSS 14 where you can easily open multple sessions of the Data Editor by just clicking on the corresponding ".sav" file listed in the file manager and a separate Date Editor opens displaying the corresponding data.
I. Alphabetizing an SPSS Date Set in PACLab
Overview
There may be times that you wish to sort your SPSS data set ".sav" file by the variable names while in PACLab. Normally you can relie on the Variables window (click Utilities --> Variables) to list your variables in alpha order but only after you have first clicked Edit-->Options and under Variable List, selected Display names and Alphabetical (you must do this each time you log into PACLab); via the Variables window you can find a variable and go to it as it lists in the Data Editor. If however your variables in the Editor list naturally in apha order, you can easily browse it directly, look for a variable, see some of its values, edit it, what ever or use the variables list in the Variables window which now lists the variables in alpha order without your setting it in the Options box each time you log in.
An Example of Alphabetizing a SPSS Data Set
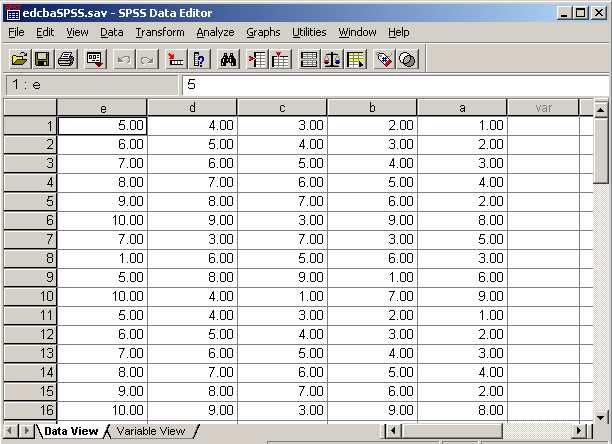
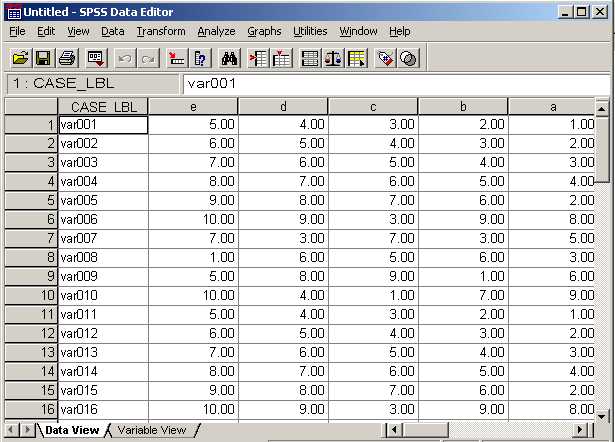
Consider this example data with variables "e, d, c, b, and a" in that order; to sort it so the names are alpha ascending, i.e. "a, b, c, d, e", you follow these steps:
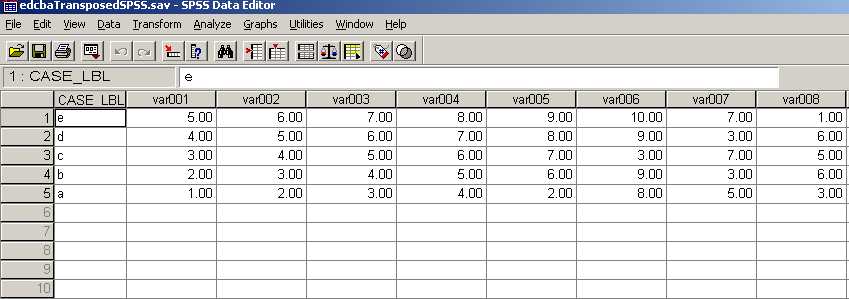
(1) Click Data-->Transpose and in the Transpose box type CTrl-A to select all variables, then click the right arrow, and then OK; this will switch rows with columns so it looks like this, where the variable CASE LBL has been added to hold the variable names "e, d, c, b, a" and where the variable names are now the default of Var0001, Var0002, ...(these are temp names and will be lost after the sort and transpose back to the normal configuration); in short the transpose results in 5 cases and a lot of temp variables (in this example the last one is an extra variable "var031" auto added with nothing but missing values; we recommend it be deleted so that's what we did, although it doesn't show in the example figure).
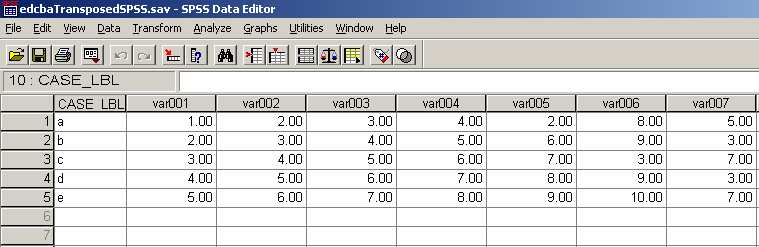
(2) Sort on the CASE LBL variable, ascending order as follows: click Data-->Sort Cases and in the Sort Cases box select CASE LBL, click the right arrow, then Ascending, and then OK. The results should look like this.
(3) Then to transpose back to the proper data set configuration, click Data-->Transpose and in the Transpose box, just as before, type CTrl-A to select all variables, click the right arrow, and then OK; the variables now list as "a, b,c ,d and e", preceeded by the CASE LBL variable. Click here to see it. The "e, d, c, b, a" data set now looks the same as originally except the variables are ordered a,b,c, d, e plus variable CASE LBL has been added at the beginning (easily deleted by selecting/pressing Delete; you may wish to keep it, especially if planning to return variables to the original order (see II. below below) or at least to remind you of the change to alpha).
(4) As a final step you may wish to save the alphabetized data set as a sepearate data set with a new name denoting that its been sorted by variable names; e.g. here the name of the saved data file might be
edcbaSortedByVars.sav
II. Returning SPSS Variables to the Original Order
Overview
If you have used the above approach to alphabetizing your SPSS data set in PACLab, there is a way to reorder them to what they were before alphabetizing. Very briefly you can do this by creating a Variable ID variable (call it VID) to represent the original order of you variables, save this in a separate save file, and then later return to the orignal order by adding the VID variable to your alpha sorted data and sorting on the VID.
Specifically This Is What You Do:
When aphabetizing via the above procedure, after you transform your data, create the VID variable equal to $CASENUM, a SPSS "built in" variable. VID now equals to the sequence 1,2,3,... for cases 1,2,3.... After you do the sort, you save VID in an SPSS save file (call it the Sort Key file), and delete VID; you then transform back to the normal configuration, with your data in alpha order. When you want to return to the original order, you transform the data, add VID by copying it from the SortKey file and pasting into the transformed, sort on it, delete it, and transform back to the normal configuration, your data in the original order. There is one thing you have to be careful about: make sure all new variables created in your alphbetized file stay at the end; after the sort returns you to the original order and you transpose back to the normal configuration, these new variables will appear as the first variables, your old variables following in their natural order.
An Example (using the "e,d,c,b,a" data in I. above)
(1) To return the example sorted "e,d,c,b,a" data to the original order, you should have done this when sorting in alpha order:
(a) Created the VID variable as a Sort Key for returning to the orginal order. Using the example "e,d,c,b,a" data set above which looks like this, perform Step (1) above to transpose the data to look like this; then add the VID Sort Key variable as follows:
Click Transform then Compute and in the Compute Variable box, enter "VID" in the Target Variable text box; then double click "All" in the Function group list and in the resulting new list, double click "$CASENUM" to bring "$CASENUM" into the Numeric Expression box; then click OK. This creates variable VID equal to the intergers 1,2,3 ... as the last variable in the editor; VID should show up like this (note in this example that in creating VID, it may actually show up next to "var031" an extra variable with missing values; delete this if you haven't already); again VID should show up in the Editor as this.
(b) Do the sort as in step 2 above where you sort on the CASE LBL variable to alpha the variable names. The Editor should look like this where the last variable VID does not show but has taken on the values "5,4,3,2,1"; these are the ID's of the variable names "a,b,c,d,e" respectively as they existed in the original order; before transposing as in step 3 above, you save the VID variable in a separate SPSS save file (e.g., call it "edcbaSortKey.sav"); see (c) below for how. Then remove VID (select then press Delete) and transform the data to its natural configuration as in step 4 above; save it as, for example, "edcbaSorted.sav". This is your alpha sorted data file; the Sort Key file "edcbaSortKey.sav" will let you return your sorted "edcba" data to its original order.
(c) Saving the VID Variable in the Sort Key File
To save the VID variable in the Sort Key SPSS sav file. you again must have done steps 1 thru 3 above so that VID has the values to return the data to its original order. You now save the Editor to protect your current progress; then open a another session of the Data Editor (click Start-->Programs-->Statistics-->SPSS for Windows-->SPSS 13.0 for Windows), return to the Editor with the data, go to the VID variable and right click the VID name at the top, and then click Copy; return to the second Editor (should be null), right click the first variable at its name (also null) and click Insert Variable; variable VAR00001 with missing values will appear; right click the name VAR00001 and click Paste; in this example VID should replace it with the values "5,4,3,2,1". Save in, for example, "edcbaSortKey.sav"; this is your SortKey file for returning to the original order.
(2)To return to the original order do these steps:
(a) Bring up the alpha sorted data set in file "edcbaSorted.sav" into the SPSS Data Editor Then open another session of the Editor (click Start-->Programs-->Statistics-->SPSS for Windows-->SPSS 13.0 for Windows) and open the example Sort Key file into this Editor session; then right click the VID variable and click Copy. Then return to the Editor with the data and transpose it (click Data-->Transpose and in the Transpose box type CTrl-A to select all variables, then click the right arrow, and then OK). Now right click the CASE ID variable at its name and then click Insert Variable; then right click the inserted variable at its name VAR0001 and click Paste; this inserts the VID variable.
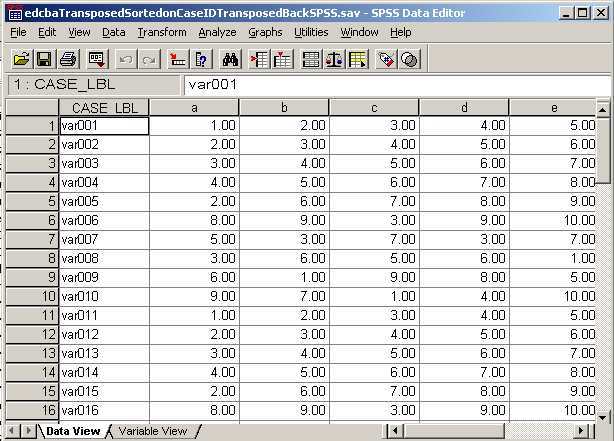
(b) To return to the orignal order, sort on VID (click Data-->Sort Cases; in the Sort Cases box, select VID, click the right arror to make VID the sort variable, and click OK). Now delete VID and transpose again; the example "edcba" data should look like this ; after you delete the CASE ID variable it should look exactly as it was; i.e., just "e,d,c,b,a" in that order .
III. How to Recover Original Values of Recoded Variables
Overview
Sometimes SPSS users, especially new ones, recode variables so that they lose their original values; here we take a look at ways to recover the original variables and their values. Basically it’s simply one of opening another session of the Data Editor with the original data unrecoded and copying and pasting the unrecorded variables into the current Data Editor, while carefully beforehand renaming the recoded variables. This of course assumes that the original data is available; this may be thru saving multiple copies before doing the recodes while not saving the recoded data in at least one of these backup areas; or it may be that you are a student, got the data via Blackboard, and saved it for yourself on the “H:” drive, the original always be available via Blackboard. For this reason we use a Blackboard example where it is assumed that you are a student who did recodes for the first time and fell in the trap of not creating the recodes in new variables.
Blackboard Example
Assume you are assigned to do statistical work with a large SPSS data file available via Blackboard (located in the Course Document area of your class on Blackboard) in a PACLab enviroment. Also assume that your first assignment is to save the data on your "H:" drive where you can access it conveniently and to do some recodes of some of the variables. You have indeed done this and saved the data back onto “H:” only to discover later that you did the recodes via the route "Data --> Recode --> Save in Same Variable" instead of the preferred route "Data --> Recode -->Save in Different Variables" (you were in a hurry to get on to your next class). In the next lab you are told that you will need those recoded variables in there original form as well as in their recoded condition. What do you do!
Using the "e,d,c,b,a" example data (much smaller than yours, but representative enough), we show how to restore variable “a” after being recoded into “1’s and “2”s, while the recoded "a" becomes variable "a2".
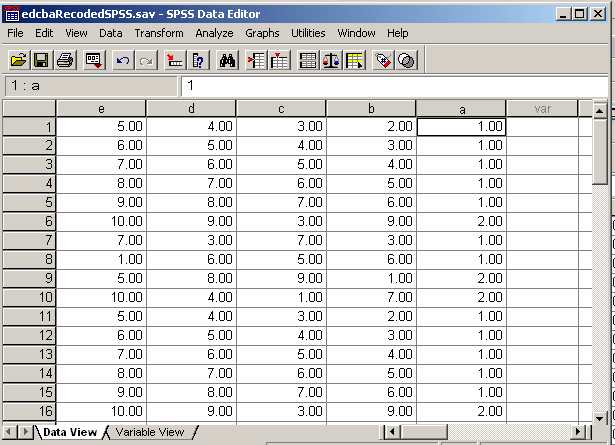
Assume "e,d,c,b,a" is now opened in the SPSS Data Editor (after retreiving a copy from Black Board and saving it on "H:"). We recode "a" by clicking Transform-->Recode-->Into Same Variables; then in the 'Recode into Same Variable" box we recode "a" into "1"s and "2"s; variable "a" now looks like this all original values lost.
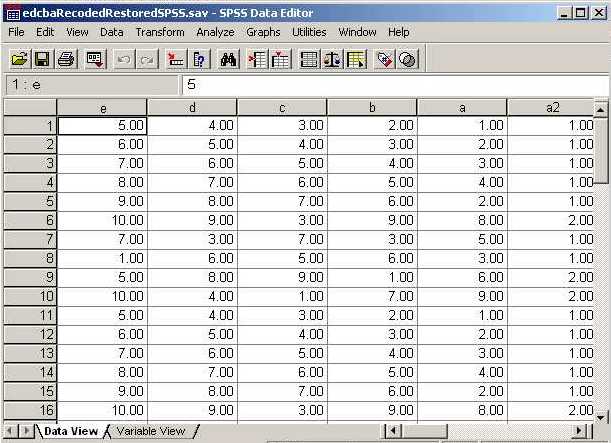
To restore "a" we first rename "a" to "a2" (just click on it so that it now appears in the Variable View mode of the Data Editor as editable and edit "a" to "a2". We now go back to our class on Blackboard and access another copy “e,d,c,b,a” and save it in “C\TMP” (this is a temp copy and will go away at log out). Now we open a new session of SPSS (click Start--> Programs --> Statistics -->SPSS for Windows -->SPSS 13.0 for Windows) and then open the “e,d,c,b,a” copy on “C:TMP” into the Data Editor of this session; here we right click on the "a" variable name and click Copy. Returning to our recoded "e,d,c,b,a" Date Editor session, we right click on "a2" and click Insert Variale; this will open a new variable column (initialized with missing values and a tmp name "VAR00001"); then we right click "VAR00001" and click Paste. We now have our original "a" right next to "a2", the recoded "a" as shown here.
________________________________________________________________________________________
_______________________________________________________________________________________
Saving Your Black Board SPSS Data File to “H:”
You went to the Course Documents for your class in Black Board where you found the SPSS data file link edcbaSPSS.sav; after clicking it, you got the “Get File Download” box where you clicked Save. In the “Save As” box you saved edcbaSPSS.sav to your “H:” drive storage.
Warning: by default if you just click Save without defining the folder to save in (in this case “H:\” or a subfolder of “H:”), you save in “C:\TMP” where it's lost after logoff; any work done on the data (like recoding) is lost including the data, the latter recoverable via Black Board.
This can come about because you as a student may tend to assume most applications in PACLab save to your “H:” by default (or to My Files, equivalent to “H:” storage) and thus not notice that the default here is “C:\TMP”; again, more specifically if you do some Recodes on the data and saved without consideration of where you are actually saving (again you assumed on “H:”) you lose your work at log out (and also the data file but again you can restore it via Blackboard).