I. About SAS (Statistical Analysis System) (GoBack)
SAS started as a system for statistical analysis and continued heavily in that direction, while rapidly expanding to other applications : data base management, file handling, report writing, as well as a language for pure programming; recently it has plugged-in into the internet. While not as user friendly as SPSS, SAS's enormous power and range of applications make it used world wide by numerous institutions (education, government, finance, corporate, etc.)
II. SAS/Windows (GoBack)
SAS/Windows in the W & M labs runs only in the SAS DMS (Display Manger System); it can not be run at the DOS command line as on a main frame such as the UNIX Stats at W & M.(where it can also be run in the SAS DMS when Stats is in the X-Windows mode). Although the DMS provides the menu system SAS/Assist (similar to SPSS/Windows), the emphasis is SAS programming/execution to get results. (See Appendix A.III for more about SAS/Assist.)
III. Starting SAS/Windows in the William and Mary Labs (GoBack)
To start SAS on a PC in the labs at W&M, click Start, then Programs then Statistics, then SAS 9, and finally The SAS System for Windows V.9..
IV. Basic Structure of the SAS DMS (GoBack)
After you do the above, the SAS DMS opens with three windows: the LOG at the top, the EDITOR at the bottom, and the EXPLORER on the left, all three shown in Fig 1. (Note: The EXPLORER here will is not discussed; instead EXPLORER(2) another window with similar functions and more powerful, will be covered).
In the SAS DMS you enter and execute a SAS program in the EDITOR; at the top, you view the log of the run (again see Fig 1 ); any output appears in the OUTPUT window which displays medium size and covers the LOG and EDITOR; the left then becomes the RESULTS window; listing output items for navigating the output and selecting parts for printing/saving/deleting. Below the EDITOR are icons for displaying the LOG EDITOR, and OUTPUT windows; below on the left are the RESULTS and EXPLORER icons for shifting between these two displays (yet again see Fig 1)
To the left of the toolbar at the top of the SAS DMS, is a small command window for executing DMS commands; here if you execute keys, for example (just type keys, hit ENTER), you get the KEYS window, which shows the F key settings (see Fig 2 ); most used are F3 to submit SAS programs in the EDITOR window for execution and F4 to recall the last executed SAS program back into the EDITOR. You can tailor any F keys in this window to your preferences (again see Fig 2 ); also see Appendix A.I & A.II for suggested key settings and how to permanently save changed settings in the lab so they will not be lost after log out.
V. Basic Structure of a SAS Program (GoBack)
A SAS program consists of Data Steps and Proc Steps in any combination.
Assume you want to do some processing of the variables AGE, SEX and EDUC using 5 cases.
1. Creating a SAS DATA Set from the Example Data: a Data Step Example (GoBack)
Type into the DMS PGM EDITOR these SAS statements (as shown in Fig
3 ) and submit for processing (via F3 or the "Submit" button
the one with the running figure on the tool bar -- again
see
Fig 3):
DATA MYDAT; |
The above is a SAS Data Step that creates working SAS data set MYDAT making it the active (current) data set for processing in other SAS steps that follow. The "DATA MYDAT" statement starts the DATA Step while also naming it "MYDAT"; the "INPUT AGE SEX EDUC" instructs SAS to read three variables in free field format and to name them "AGE", "SEX", and "EDUC"; the "CARDS" statement tells it to read the data from within the program starting with the line(s) that follow until another SAS statement (identified by a ";") is reached or no more lines; here the "RUN:" statement ends the data while also telling SAS to execute the preceding statements (even though you may tell SAS to submit it -- via F3 or the tool bar Submit icon -- the "RUN;" statement in the program instructs SAS to actually run (process) the SAS pgm statements; otherwise the output only shows after you submit another SAS pgm with a "RUN;" statement. Fig 4 shows the SAS DMS after running the example program, the record of the results showing in the LOG.
Note: in the LOG the complete data set name assigned to the read data is " WORK.MYDAT" ( again see Fig 4), indicating that it is work data, lost after you leave the SAS DMS (if not permanently saved before you exit-- see 8. below for how) The data set name "WORK.MYDAT" is determined by taking "WORK", the name of the scratch library where the data is stored, and joining it with a period (".") and "MYDAT", the name specified in the example DATA statement "DATA MTDAT" above.
Also Note: when you submit the EDITOR for running, only
selected statments (those highlighted or all by default) are actually
submitted; thus, in our example the entire EDITOR
was submitted because there was no explicit selection
(i.e., all programming was selected by default). To avoid having to explicitely
select the programming, when there are previously executed
statements in the EDITOR, clear the EDITOR before typing the new
statements (either by selecting all/pressing Delete or clicking
the Clear All icon -- denoted by an "X" -- on the toolbar).
Any erased previous executed programming can be redeemed via the
Recall cmd (F4 key), which recalls successively previously submitted
programs.
2. Listing the Example Data: a Proc Step Example (GoBack)
To list the example data, run the following statements by clearing
the EDITOR (just click the toolbar "X"), typing the statements,
and submitting them (just click the toolbar "Submit" icon or
press F3):
PROC PRINT; RUN;
The OUTPUT window will open with the example data listed (as
shown in Fig 5); at the same time the left window
becomes RESULTS and represents the PROC PRINT output via the "Print:
SAS System" item (again Fig 5 ) which can be
opened to make it appear as in Fig. 6 by
clicking the "+"; this makes it become a "-" to show that it has been clicked.
To return to the LOG-EDITOR windows, just minimize OUTPUT (should
then look as in Fig 4 except RESULTS on
the left, "PROC PRINT; RUN" in the EDITOR, and the "PROC PRINT"
log is add to the LOG.display) .
Note: PROC PRINT uses the active (current) data set (assumed to be MYDAT created in 1. above); to use an alternate set, you include the "DATA=" specification (as exemplified in 9. below, 2nd example ); you specify the data set with "DATA=" in any Proc Step if the active set is not desired (or you can't be sure which is active -- execute PROC CONTENTS to find out).
3. Frequency Distributing the Example Data: another Proc Step Example (GoBack)
To obtain a one-way frequency distribution of the example data, clear the EDITOR, type the following, and run:
PROC FREQ; TABLE AGE SEX EDUC; RUN;To get a two-way frequency distribution of the example data between SEX and EDUC, don't clear the EDITOR, and edit the above TABLE spec to look like this:
PROC FREQ; TABLE SEX*EDUC; RUN;Now run. Fig 6 shows the output.
Note that here all items in the RESULTS window have been opened (by clicking all "+"s and making them minus), these items now represent the example PROC PRINT output and the two example PROC FREQ outputs and can be used to display any one part of the output by double clicking its corresponding item in the RESULTS window (e.g., double clicking "Data Set WORK.MYDAT" under "Print" in RESULTS -- see Fig. 6 -- yields the output in Fig 5, double clicking "One-Way Frequencies" under "Table EDUC" in RESULTS -- again see Fig. 6) -- shows a one way frequency of EDUC in the OUTPUT window -- not shown here).
4. Sorting and Listing the Example Data By SEX (GoBack)
Run the following statements to first sort the example data by
SEX and then list by SEX
PROC SORT; BY SEX;
PROC PRINT; BY SEX; RUN;
5. Creating a Data Set from a TXT File Source: another Data Step Example (GoBack)
Execute these statements in the EDITOR:
DATA MYDAT;Here the Data Step creates the same data set as produced by the example SAS pgm in 1. above, the differences being that its read from file H:\SAS\MYDAT.TXT (again in free field format) instead of from within the program -- see 1. above. File MYDAT.TXT must have already been created and saved as a text file in an editor such NotePad or spreadsheet such as Excel; the "H:" is the lab's "H" drive remote storage. The 'H" can be some other drive such as the diskette drive "A:" or the USB Key Memory drive (usually "D" or "E", which ever gets assigned). Note that SAS requires the INFILE statement before the INPUT statement in a Data Step (if you try it otherwise you'll get a sample error message in the LOG).
INFILE D:\SAS\MYDAT.TXT;
INPUT AGE SEX EDUC;
RUN;
6. Creating a Data Set in the DATA VIEWTABLE Instead of Running a Data Step to Create It (GoBack)
Open VIEWTABLE by clicking TOOLS, then Table Editor; the VIEWTABLE should appear as in Fig 7 except that all the cells are empty and the columns labels are the default ones A, B, and C. Now enter the example data and change the default variable names from A, B, C to AGE, SEX, EDUC (by clicking each name and editing it; e.g., edit column 1's default name "A" to "AGE"); the VIEWTABLE should now appear exactly as in Fig 7. This data. however, does not become a working data set until saved in the SAS WORK library; to do this, click FILE, Save As , and in the "Save As" box, and click "Work" in the "Contents of" column; then in the "Member Name" box below enter any name not listed in the 2nd column (displays any previously created work data sets); in our example, you enter "MYDAT" in the "Member Name" box (should look as in Fig 8 where no previous "Work" data sets list in the 2nd column) and then click "Save". The title for the VIEWTABLE should now show as "(Saved As: Work.MYDAT)" instead of the default "(Untitled)" in Fig 7.
To permanently save the VIEWTABLE data (not just make it WORK data available only for the active SAS DMS session), see 10. below .
7. Saving the Example Data Set at Creation Time in a Data Step (GoBack)
When you run the following Data Step, again reading the data from
a file as in 5. above, you create a permanent
active (current) data set file (not lost after exiting DMS):
LIBNAME LIBDIR D:\SAS\;
DATA LIBDIR MYDAT;
INFILE H:\SAS\MYDAT.TXT;
INPUT AGE SEX EDUC;
RUN;
Note how it is necessary to specify the library to store the data
set (on PC/ SAS a library is identical to a directory, where here
the library is the H:\SAS\). The data set here is stored as
SAS System file 'MYDAT.sas7bdat\'" in the 'H:SAS' folder, while being retained
as the active working data set. In any SAS program the
complete specification of a data set has the format libref.dataname,
where libref references an opened library (opened in the above
example via the LIBNAME statement , defaulting to WORK if not
defined); and dataname names the data; thus the complete
specification of the data set created in 1.
and 5. above is WORK.MYDAT (WORK referencing
a scratch library automatically opened by SAS, MYDAT the specified
set name). For more about data set libraries and ways to open them, see
Appendix
A.IV .
8. Saving the Example Data Set after Creation in a Data Step (GoBack)
Having created working SAS data set MYDAT via 1.
or 5. above , you can permanently
save it by running these statements:
LIBNAME LIBDIR H:\SAS\;
DATA LIBDIR.MYDAT; SET MYDAT; RUN;
Where the active working data set MYDAT is specified
on the SET statement, becoming the data set created by the
Data Step, while the step itself permanently saves in the manner
of 7. above.
Note: as with both 7. above and 8. here, the success of permanently saving a data set is recorded in the LOG window as shown in Fig 9 for this example.
9. Retrieving the Example Data Set (GoBack)
To retrieve the example data set saved in 7.
or 8. . above, you retrieve i n
a Data Step and make it the working set or retrieve it
directly by a Proc step just for that step alone. To retrieve in
the Data Step you can run these statements:
LIBNAME LIBDIR H:\SAS\;where the SET statement retrieves with the same specification for saving in the Data statement of 8. above.
DATA MYDAT; SET LIBDIR.MYDAT; RUN;
To retrieve directly in a Proc Step, for example,
the PROC PRINT step, you include the DATA= specification
as follows:
LIBNAME LIBDIR D:\SAS\;(If you leave out the "DATA=" option but run the above Data Step, the results are the same because it then prints the active data set "WORK.MYDAT" which should be the same data.)
PROC PRINT DATA=LIBDIR.MYDAT;RUN;
10. Saving, Retrieving, and Printing a DMS Window (GoBack)
You can save the contents of a DMS window (except the DATA VIEWTABLE - - see below ) using the convention for saving most application windows (make the window active by clicking in it, then click FILE, then Save As., etc. ); to retrieve it's similarly conventional (click in it to make active, click FILE, then Open, etc. -- works with the DATA VIEWTABLE too); to print, it's also similarly conventional (make it active by clicking in it or by clicking its icon at the bottom of the DMS, then click FILE, then Print, etc.) with these exceptions:
To save the DATA VIEWTABLE in an existing library, click Save As from FILE, then the desired library (e.g., Work as shown in Fig 8), then type the data set name (e.g., MYDAT) in the "Member Name" text box, and click OK; the DATA VIEWTABLE is then save as a SAS data set in the WORK library (e.g., as data set MYDAT).
11. More SAS Programming with the Example Data
(GoBack)
(a) Creating Two Data Sets While Manipulating the Data (GoBack)
The following Data Steps assumes working data set MYDAT has been created with the example data in 1 above.
DATA MYOLDAT; SET MYDAT;
IF AGE < 30 THEN DELETE;
DATA MYRECAGE; SET MYDAT;
IF AGE < 30 THEN RECAGE=1;
ELSE RECAGE=2;RUN;
where MYOLD AT contains only cases where AGE >= 30 and MYRECAGE re-codes age into 1s and 2s to represent those < 30 and >= 30, respectively; you now have two working data sets, MYOLDAT and MYRECAGE, the latter being the active (current) working set. Assuming you want to print these sets out with no confusion about what set you are printing (e.g., which is active?), you use the DATA= in the following Proc Steps:
PROC PRINT DATA=MYOLDAT;Note: In the above Data Steps the library reference (libref) for the data set is omitted in the "DATA" statement, making the data sets MYOLD and MYRECAGE scratch (members of the WORK library) because "libref" defaults to WORK (as the LOG window will indicate).
PROC PRINT DATA=MYRECAGE;RUN;
(b) A Proc Step to Perform Multiple Regression (GoBack)
The following GLM (Generalized Least Squares Model) Proc Step does a multiple regression with EDUC dependent and AGE and SEX independent (assuming the active working data is the example data in its original form):VII. Using SAS Help (GoBack)
PROC GLM; MODEL EDUC = SEX AGE;
RUN;
Note how little is required to specify the analysis if you use the defaults and that only a modest adjustment is required to do an analysis of variance with essentially the same model (using category variables RECAGE and SEX as dependents instead of interval variable AGE and category variable SEX treated as interval) as follows:
PROC GLM DATA=MYRECAGE;
CLASS RECAGE SEX;
MODEL EDUC =RECAGE|SEX;
RUN;
Also note how the data set MYRECAGE (created in (a) above) is accessed (via the DATA= spec) to make available the class variable RECAGE.
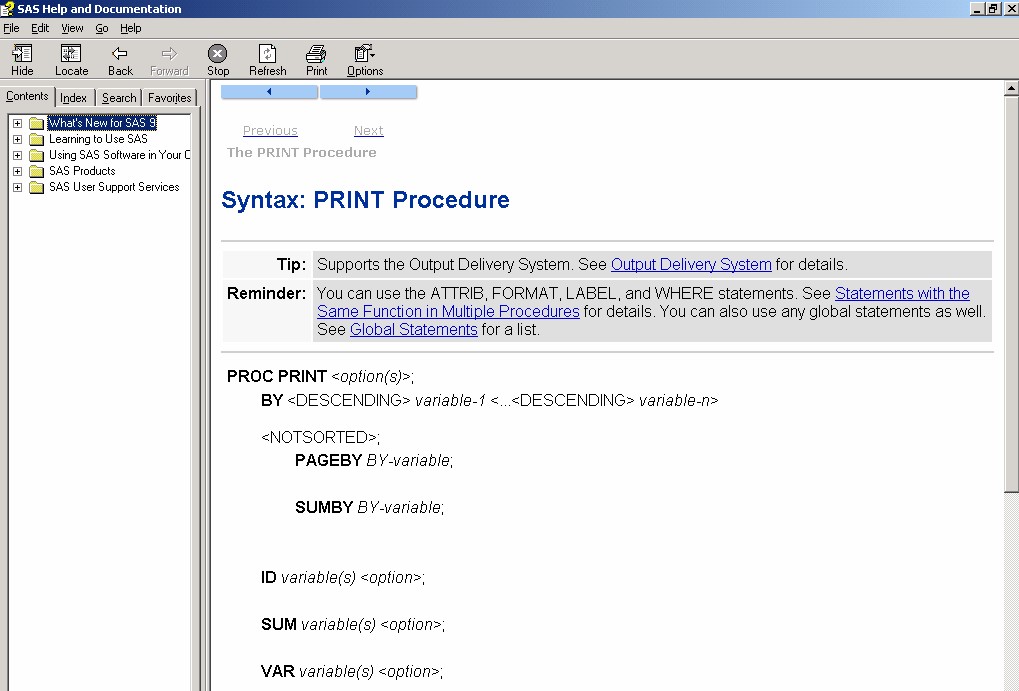
Although the SAS/Windows Help is vast, the following areas of help should go a long way to helping you with SAS/Windows:
To access WEB SAS Online Documentation, click "Help" on the menu
in Fig. 1, then "SAS on the WEB"; this lists
the following items which you can click now to access the corresponding
WEB Page: Technical
Support, Frequently
Asked Questions, Send
Feedback, and SAS Institue Home
Page.
Appendix AMore about SAS/WindowsI. Your SAS F KEY Settings (GoBack)The default SAS F key settings as shown in Fig 2 can be changed by opening the KEYS window (by (1) clicking HELP, then Keys or (2) executing Keys in the command window -- upper left Fig 2 or (3) just pressing F9) and editing the settings to whatever desired; any changes go immediately into effect, even before you close the KEYS window. In the W & M computer labs, these new settings remain until you log out, with the keys reverting to the defaults shown in Fig 2 when you log back in; see II below for how in the labs to save altered (tailored) SAS F KEY settings and then in a new log access them in SAS. If on the other hand you are using your own PC, any new settings should remain on your hard drive until you change them, automatically available any time you start SAS. |
Most of the SAS DMS cmds that you can set the keys are listed in help as described in VII. 3. above; you can set a key to multiple cmds, separating them by semicolons (";"s) as shown for F8 in the Keys window (Fig. 2) where it is set to the cmds "zoom off; submit" (F8 here would normally be used when you are in a maximize EDITOR; then when pressed, F8 would un zoom it to medium size, while sending selected SAS statements to the DMS for execution).
You might, for example, wish to set F12 (not set by default as shown in Fig. 2) to the "Clear" cmd, allowing you to use F12 rather then the less convenient keys Ctrl-E (set by default to "Clear" -- not shwon in Fig. 2). Or you might want to modify F6 in Fig. 2 from just "log" to "log; zoom on", so you can in one depression of F6 make the LOG window active and full size.
II. Saving and Retrieving Your SAS F KEY Settings in the Labs (GoBack)
As mentioned in I. above new SAS KEY
settings remain until you log out; a new log in reverts
to the defaults shown in
Fig 2. The following procedure will
save new settings and gets them back in another log in session:
Sometime after exiting SAS after making the new KEY settings but before logging out, copy (using Windows Explorer) this SAS catalog folder, which has the new settings, onto your "H:", USB Memeory Key, or Diskette:III. The SAS/Assist Menu System: an Alternative to SAS Programming (GoBack)C:\Temp\MY SAS FILES\V9\PROFILE.SAS7BCAT (the file in Windows Explorer is listed as a SAS System Category folder, the icon showing in folder yellow with a red dot).
With a new log in before starting SAS, restore the SAS categary folder "PROFILE.SAS7BCAT" to the same location on the PC that you logged in; you can do this by using "Windows Explorer" to copy "PROFILE.SAS7BCAT" on your "H:", USB Memory Key, or Diskette to
C:\Temp\MY SAS FILES\9V\
As mentioned in II above in the main text, SAS provides the menu facilities SAS/Assist, which is similar to SPSS/Windows; although SAS/Assist does not support all features of SAS, it does, however, get results without your doing the SAS programming (the program automatically created by SAS/Assist and shown in the LOG window after execution). You are welcomed to try it; to get you started we take you through SAS/Assist to do a simple bar chart of the variable EDUC in the above example data.
To open SAS/Assist, click SOLUTIONS on the main menu (see Fig 1), then "ASSIST; a SAS/Assist Welcome" box should display; click Continue and keep clicking Continue with successive boxes until the "SAS/Assist: Work Place" window appears with a menu item table as in Fig 11 (where we have closed the left window Results/Explorer(1)). Each item leads to a drop down menu which should give you an idea of what's included under a given item in the WorkPlace window (e.g., see Fig 12 for the "GRAPHICS" drop down menu). Some items in the drop down lead to drop down sub menus (e.g., the "Plots" item in Fig 12 ). Without going into all the items in the SAS/Assist WorkPlace Menu, we mention these: the "REPORT WRITING" item (again see Fig 11 ) displays your data in lists, tables, reports, and summary statistics; the "DATA ANALYSIS" item outputs summary statistics, frequencies, simple correlations, regression analysis, analysis of variance, multivariate analysis, time series analysis, etc.; the "GRAPHICS" item provides everything graphical about your data from bar charts to line plots (as seen in Fig 12). You may also see some overlap in going from one menu to another; thus the "Summary Statistics" item appears in a sub menu when you click REPORT WRITING's "Utilities" item and also when you click DATA ANALYSIS's "Elementary Statistics" item (still again Fig 11 for the "SAS/Assist WorkPlace").
To get the example bar chart, you click "GRAPHICS" (Fig 11); as mentioned earlier, this displays the "GRAPHICS" menu shown in Fig 12; click the "BAR CHARTS" item and you get the "Bar Charts" dialog box as shown in Fig 13 . To output a simple 2D bar chart with veritcal bars, which is all you are going to do here, you fill in only the required specifications, letting everything else default. As indicated in Fig 13 you are required to specify the "Table" (upper left Fig 13 ) which is the same as a SAS data set and the "Chart column" (just below the chart pattern in Fig 13), the variable in the data that you want to bar chart . To do the first, you click "Table" to get a list of SAS data sets found in currently opened SAS libraries.
We now digress and explain/review how SAS makes data sets available when you are in the SAS DMS, including of course SAS/Assist. The SAS DMS, unlike other applications such as SPSS/Windows in which you access a data file by opening it, requires you to open instead a SAS library (a disk directory/folder, e.g., "H:\SAS" that contains SAS data set file(s)); then the data of any data set file found in the library becomes available anywhere in the DMS (SAS programs, SAS/Assist, and the SAS VIEWTABLE). Since a file with the extension "sas7bdat" (e.g., "mydat.sas7bdat") is a SAS System Data File and therefore a SAS data set, the data sets in all files with the "sas7bdat" extension in an opened SAS library can be accessed throughout DMS (e.g., the data set in file "H:\SAS\mydat.sas7bdat" after opening "H:\SAS\" as a SAS library) . There are several ways to open a SAS library and these are discussed at length in IV.B below; for now, consider the WORK library, a scratch folder that SAS automatically opens when you open SAS DMS and subsequently SAS/Assist in the labs. Assume that you have done either VI.1 , VI.5 , or VI.6 above, to create the data set WORK.MYDAT in the WORK library and make it available else where in the SAS DMS including of course SAS/Assist .
We now go back to our example above where you click "Table" in Fig 13; to specify your source data. The "Select Table" dialog box opens, listing in the "Libraries" column all currently opened libraries, WORK being one of them (plus others may list also automatically opened by SAS); click WORK and all available data sets in the scratch WORK library list in the "Tables" column of the "Select Tables" box (see Fig 14) ; the example data MYDAT is one of them (the others autoamtically provided by SAS for utility purposes); when you click MYDAT, the example data set WORK.MYDAT is selected as shown in the "Table" sub box at the top of the "Table Select" box in Fig 14. Click OK and the example data set "WORK.MYDAT" becomes the "Table" source data for the bar charts as shown in Fig. 15.
Now click "Chart column" (as it shows in Fig 13 ), select (double click) EDUC which lists with the variables AGE and SEX in a "Select Table Variables" dialog box (not shown); Fig 15 shows the results with EDUC the designated "Chart variable".
To run your specified Bar Chart in Fig 15 click Run on the main menu, then Submit; your Bar Chart of EDUC should now appear as in Fig 16, the results of the execution in the LOG window, Fig 17; from the latter you can get a good idea of the programming that you generated via SAS/Assist in order to create the Bar Chart. To return to the "Primary Menu" (or any place left opened that your creation of the Bar Chart took you), you can press successively the F3 key (or any key set to "end" in the KEYS window); this backtracks you through previously opened windows/boxes until you are where you want to be (including exiting SAS/Assist). Note: remember that if you exit SAS/Assist this way, the F key used to leave it now submits any SAS pgm statements in the PGM EDITOR (assuming it active); thus successively pressing the F key many times to leave SAS/Assist may inadvertently submit a pgm in the EDITOR.
IV. SAS
Data Set Libraries and Ways to Open Them in DMS (GoBack)
A. What is a SAS Data Set Library/How used?
In the SAS/DMS a SAS data set is associated with a library for either saving or accessing it; a given SAS library is opened as an area of disk storage (e.g., either a folder such as "H:\SAS" or the root "H:\"); thus, the complete name of a data set referenced in the DMS has this form:
libref.dataname
Here "libref" is the name of library that has been opened in DMS and contains the data set; "dataname" is the name of the data Examples:
dataname.sas7bdat
where dataname is the same as that in the complete data set name which again has the form "libname.dataname" and is exemplified in example 2. above; thus the file that houses the "MYDAT data is "mydat.sas7bdat" and is located in the "H:\SAS" folder and has the path "H:\SAS\mydat.sas7bdat".
Any SAS data set library such as LIBDIR that has been opened in the SAS/DMS permits accessing any data sets in the library that are in files with the extensions "sas7bdat" (listed in Windows Explorer under Type as "SAS System Data Set"); they are located in the disk directory/folder defined for the library (again the above example 2 folder "H:\SAS' for the "LIBDIR" library example); any part of the DMS can access these data sets: (1) executed programs in the EDITOR, (2) the VIEWTABLE, and (3) SAS/Assist.
B. Ways to Open a SAS Data Set Library
A SAS library can be opened both for saving and accessing SAS data sets and SAS catalogs (special SAS storage for saving information such as Key settings); here we confine the use of the SAS library to SAS data sets.
1. Opening a SAS Scratch WORK Library
The SAS "WORK" library automatically opens when you start SAS/DMS; "WORK" houses all the temporary data sets created in DMS; e.g., the temp data set "WORK.MYDAT" discussed in B.1 above. Any data set referenced in DMS without the library reference (e.g., "MYDAT" instead of "WORK.MYDAT") defaults the library reference to "WORK", a common practice as illustrated in the SAS pgm DATA statement of VI.1 and SET statement of VI.8 above.
2. Opening a SAS Library with the "LIBNAME" Pgm Statement
The obvious way to open any SAS library (i.e., any but the "WORK" library discussed in 1. above ) is by running the "LIBNAME" SAS statement in the PGM EDITOR; "LIBNAME" has this format:
LIBNAME libref path
where "libref" is arbitrary and references (gives a handle to) the opened library and "path" identifies the library's disk location (where data set files -- those with "sas7bdat" extensions -- are stored). SAS pgm examples in VI.7 and VI.8 illustrate using "LIBNAME" to open and then save a data set; the examples in VI.9 exemplify the statement's use for just accessing a data set. Other data sets that happen to be located in the same library are also available once the library is opened; thus, after executing the 2nd example pgm in VI.9 above, if the data set MYDAT2 is also in the "LIBDIR" library (specifically in file "H:\SAS\MYDAT2.sas7bdat") then that data set is accessible and can be similarly used in PROC PRINT, specifying this time "DATA=LIBDIR.MYDAT2" (again see VI.9, 2nd example).
3. Opening a SAS Library Via the Toolbar "SAS Explorer (2)" Icon (just left of the "Run" icon -- see Fig. 1 )
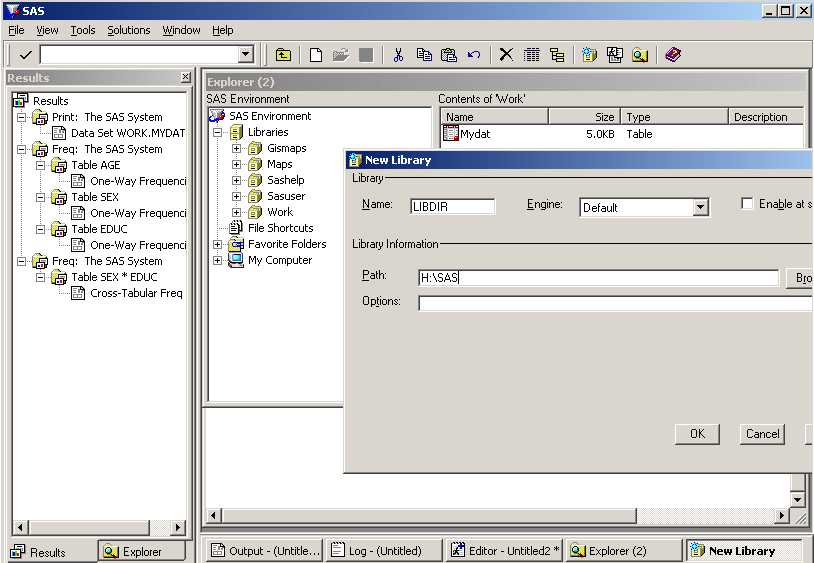
The "Explorer (2)" icon when clicked opens the "EXPLORER (2) SAS" Environment window (see Fig 18); this not only allows you to open a library (by right clicking Libraries , then New -- again see Fig 18), but also see what libraries are already open plus the data sets and catalogs within each (we shall ignore catalogs). In Fig 18 the contents of the familiar scratch "Work" library of B.1 are listed in the right sub window (the result of clicking "Work" in the left sub window), showing here the single data set "Mydat"; we shall assume you created it by running the SAS pgm in VI.1 above. The other opened libraries in the left sub window of Fig 18) are automatically opened by SAS (just like "Work"); we shall ignore these in addition to the catalogs.
As mentioned above you open a library by right clicking Libraries in EXPLORER (2) and then clicking New; which opens the "New Library" box (as shown in Fig 18); here you simply type in an arbitrary library reference name in the Name entry sub box (e.g., "LIBDIR" in Fig 18) and its path/folder in the "Path:" box; if you prefer, you can do the latter by clicking Browse and selecting the folder from a drive list. After you click OK in the "New Library" box, your "LIBDIR" library in "H:\SAS\" lists under Libraries in "Explorer (2)" (Fig 19, left sub window) ; when "LIBDIR" is clicked (thus selecting it), its contents lists in the right sub window; again see Fig 19, noting "LIBDIR"'s data sets as MYDAT and MYDAT2 (assumed created in previous SAS/DMS session(s)). The data in MYDAT and MYDAT2 are now available throughout the SAS/DMS.
Note: alternately you can directly open the "New Library" box by clicking its icon just to the left of the "Explorer (2)" icon on the toolbar; here you can open a SAS library without going through the ""Explorer (2)". This does not, however, let you immediately see the results, this occurs with "Explorer (2)" when you OK the "New Library" box in Fig 18 and then click LIBDIR in Fig 19. to show that the data sets MYDAT and MYDAT2 are available in LIBDIR.
Also Note: in our SAS/Windows Introduction we ignored the "Explorer (1)" window, located on the left of DMS (see Fig. 1); this is because even though "Explorer (1)" acts much like "Explorer (2)", it doesn't have all the conveniences, including two sub windows, which can list the libraries on the left and their contents on the right. Also in "Explorer (1)" it's more difficult to back up to higher levers (e.g., from a list of libraries back to the display of Fig. 1; requiring you to click the Up One Level item in the VIEW menu.
4. Opening a SAS Library While in the DATA VIEWTABLE Window
In VI.6 we discussed how to use the DATA VIEWTABLE to enter data and assign it to the WORK library and make it scratch (WORK) data; in VI.10 we showed how to save the VIEWTABLE into a data set file in a library (see VI.6for how to open the VIEWTABLE). You can also while in the VIEWTABLE open a library and retrieve a data set from a SAS library into the VIEWTABLE (instead of typing the data into the table); in the process you may have to open a library (if not already opened) which remains open for the SAS/DMS session. Thus another way to open a SAS library which doesn't require you to retrieve data if just opening the library is your objective, but more than likely you are opening it to get data into the VIEWTABLE so we cover that too.
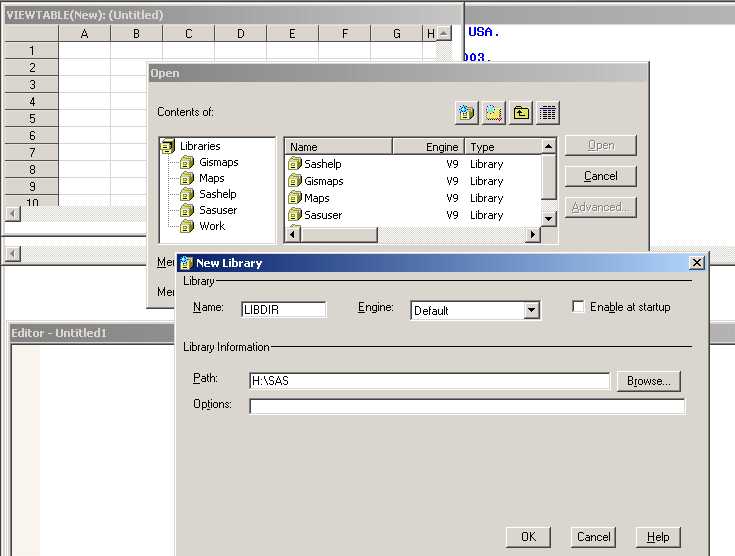
To open a SAS library while in the VIEWTABLE (again see VI.6 for how to open), click FILE, then Open, and in the "Open" dialog box, click the "New Library" icon (left most icon, upper right -- see Fig 20 ); this opens the "New Library box and you proceed to open a library, e.g., folder "H:\SAS" as library LIBDIR as shown in Fig 20 just before you click OK to open the example LIBDIR library. Fig 21 shows the results after you next click (select) LIBDIR in the "Contents of" left sub window of the "Open" box; here the right sub window lists the data sets "MYDAT" and "MYDAT2" as members of LIBDIR, available for opening (retrieving) into the VIEWTABLE.
In Fig 21 you select MYDAT2
to open by just clicking it (thus highlighting it). If you just want
to browse the data in MYDAT2 in VIEWTABLE, you just click Open and
the data appears in the VIEWTABLE, unchangeable. If you want to edit MYDAT2
( e.g., change some values or add new rows), you click Advanced
and then the Advanced tab in the emerging "Advanced" box (see Fig
21 ); then double click the tiny circle next to Edit and
click OK ; in the "Open" box click Open.(again see Fig
21); the data in MYDAT2 should appear in the VIEWTABLE ready for
editing. To add data rows you right click anywhere in the left
most column of the VEWTABLE (the column with case numbers), then click
Add Row; only a new row will show and you enter the new data; repeat
for each new row. To commit the current new row and view/edit both
old and new data, again right click anywhere in the left most column,
then click Commit New Row.
| Figure 1 (SAS DMS after Start Up)
|
Figure 2 (The Keys Window after Opening with the "keys"
Command)
 |
Figure 3 (The Example Program
after Typing into the PGM EDITOR) |
Figure 4 (The DMS after Running
the Pgm to Read the Example Data)
 |
Figure 5 (The OUTPUT Window after
Running Proc Print to List Data)
 |
Figure 6 (OUTPUT of Proc
Freq: a Two-Way of SEX vs. EDUC)
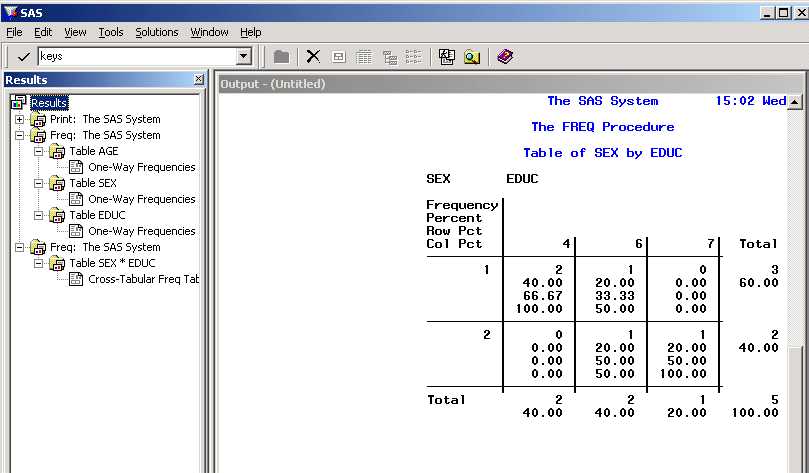 |
Figure 7 (The VIEWTABLE after Entering
Example Data/Names)
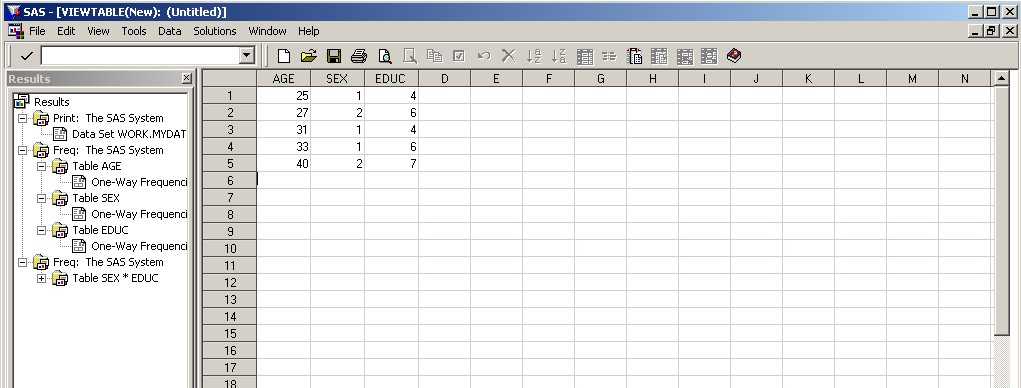 |
Figure 8 (" Save As" to Save VIEWTABLE
as Active WORK Data with Name MYDAT)
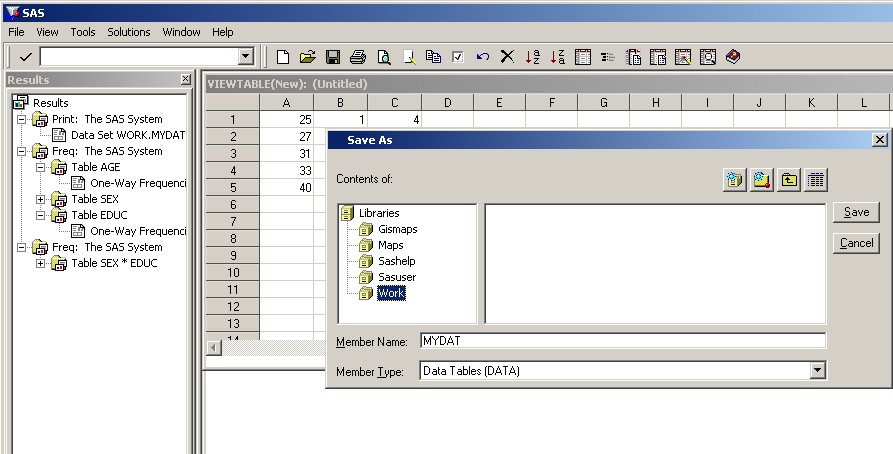 |
Figure 9 (The LOG after Running
SAS to Permanently Save MYDAT)
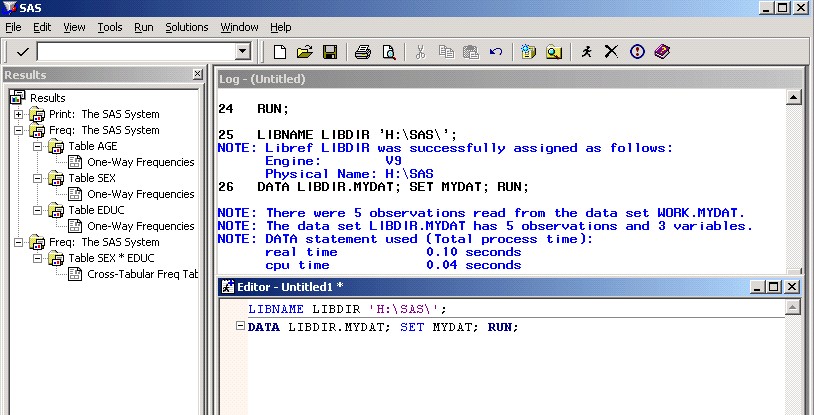 |
Figure 10 (Example SAS Help:
the Syntax of Proc PRINT)
 |
| Figure 11 (The SAS/Assist WorkPlace
Window
-- Results/Explorer(1) Closed) 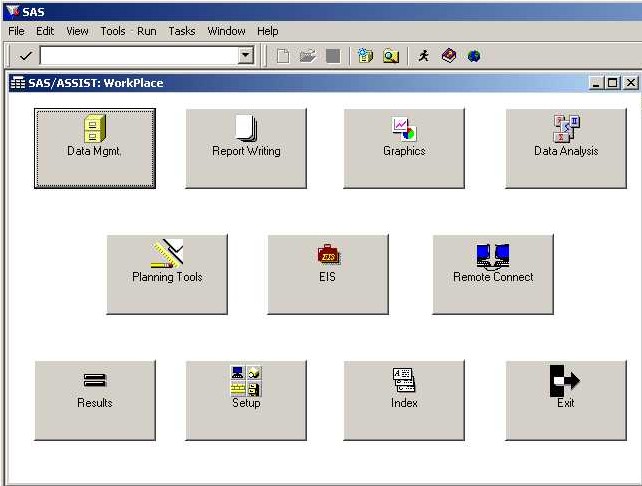 |
Figure 12 (Graphics Menu after
Clicking Graphics Icon in Fig 11)
 |
Figure 13 (The "Bar Charts" Dialog
Window)
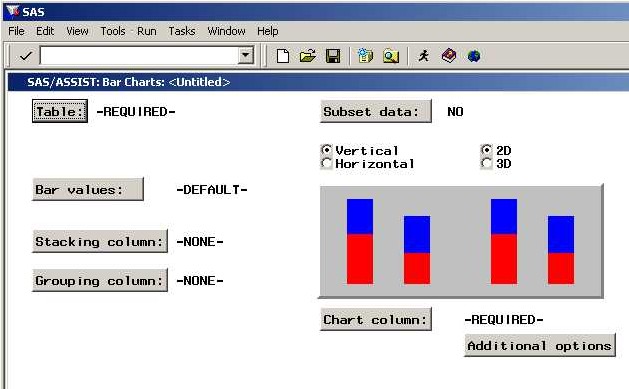 |
Figure 14 (The Select Table Box
After Selecting WORK.MYDAT)
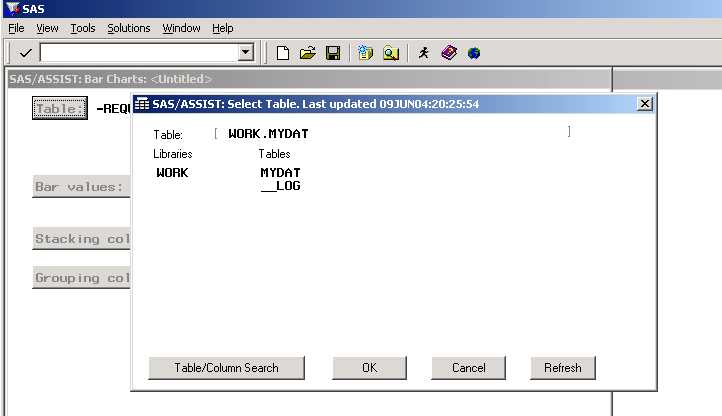 |
Figure 15 (The "Bar Charts" Box
Ready to Run)
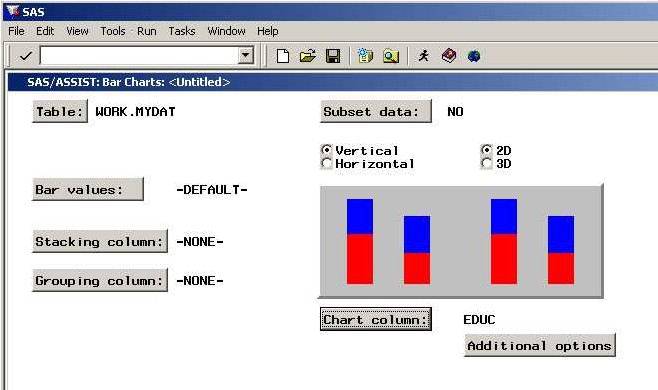 |
Figure 16 (Example Bar Chart of
EDUC Created via SAS/Assist)
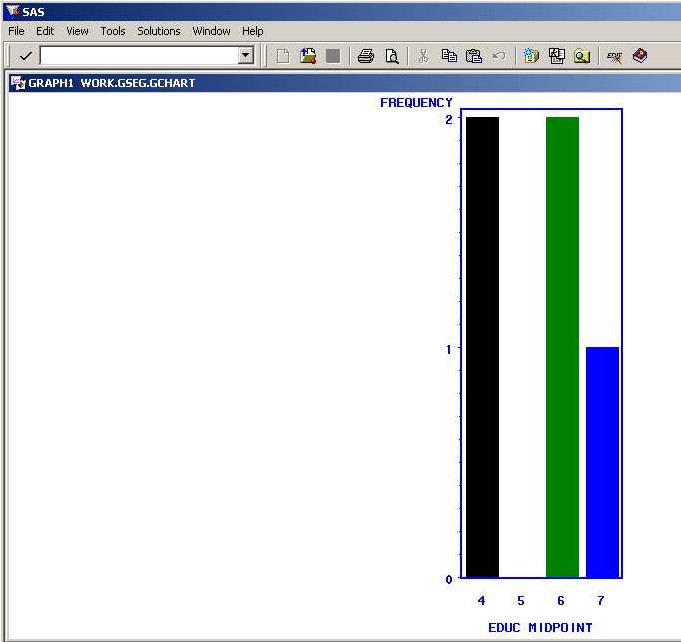 |
Figure 17 (Last of the Log
from Running the SAS/Assist Bar Chart Box in Fig
15 )
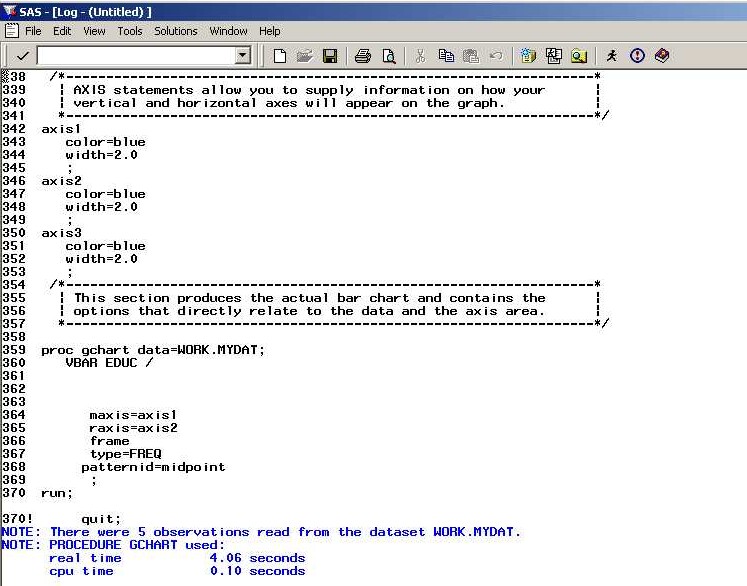 |
Figure 18 (EXPLORER (2) after
Listing WORK Library Contents, then Opening New Library to
Define/Open Library "LIBDIR" at "H:\SAS")
 |
| Figure 19 (The EXPLORER(2) Listing
LIBDIR Data Sets after
Opening It in Fig 18) 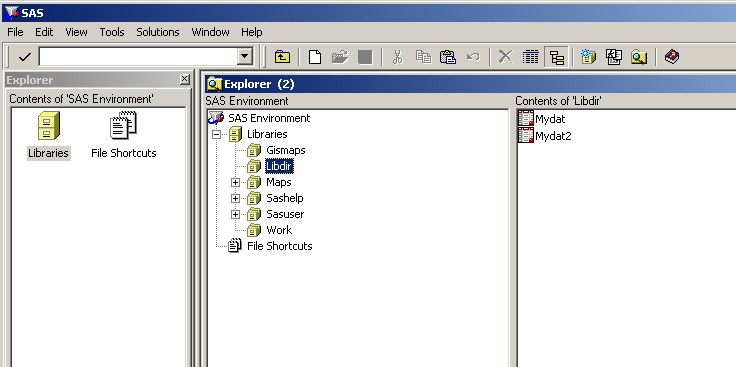 |
Figure 20 (The VIEWTABLE Open
Dialog Box after Opening New Library to Define/Open Library
LIBDIR at "H:\SAS")
 |
| Figure 21 (The Advanced Box
"Edit" Doubled Clicked to Open
Mydat2 into the VIEWTABLE in the Edit Mode) 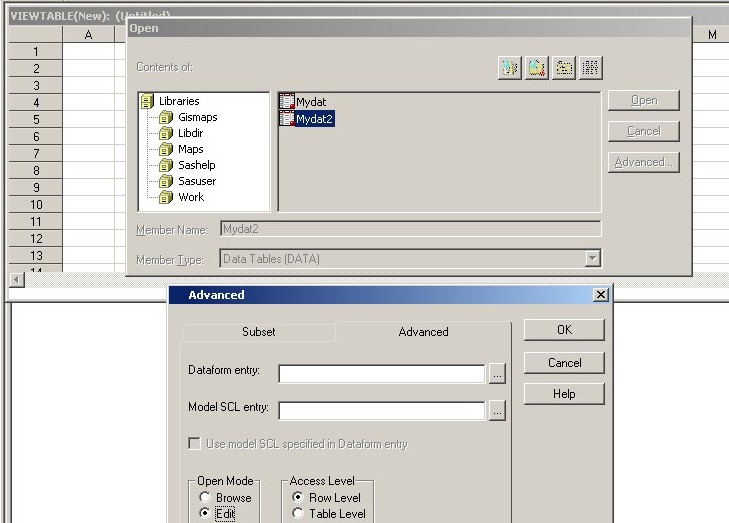 |