PAClLab's Home Site Bob Dawson's Web Site
Scanning in the W & M Labs
Scanning Services| Getting Started| Scanning/Processing Images| Scanning/Processing Documents
Scanning stations are available in the following PACLabs:
Barrett | Marshall-Wythe | Morton 243 | Swem 2nd/3rd | SwemCommons | Tyler | Watson
Currently, each labs listed above contins an HP Scan Jet 3600 Scanner with the exception of Swem Commons which has two. The Scanner is connected to a single workstation, which supports the software to scan, process, and save/print anything that fits in the Scanner (a photograph, printed sheet, or a page in a book); from this station only can you use the Scanner. The Scanner, along with the supporting software, enables you to scan an image into the computer in digital form; once this is done, depending on how you define the source, either strictly as an image or as both image and editable text, you can edit it, print it, save it, and/or insert it inside a presentation showing in an opened applications such as, for example, Microsoft Word, Power Point, or a Web page in Front Page Editor. Be aware, however, that scanning and reusing a copywrited item is illegal -- if you shouldn't photocopy it, you shouldn't scan it.
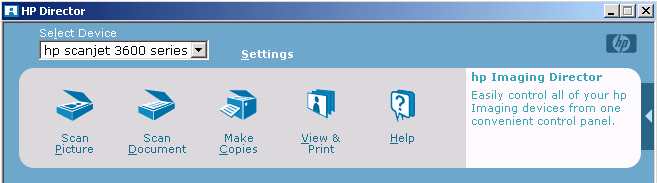
To get started, log into a lab's Scanner station and click HP Dir from Scanner in the Specialty Software menu (under Programs under Start). The "HP Director" window opens as in Fig. 1 below, where you can click on any of the following items to performed the indicated operations:
Fig 1 - The Scanner
HP Director
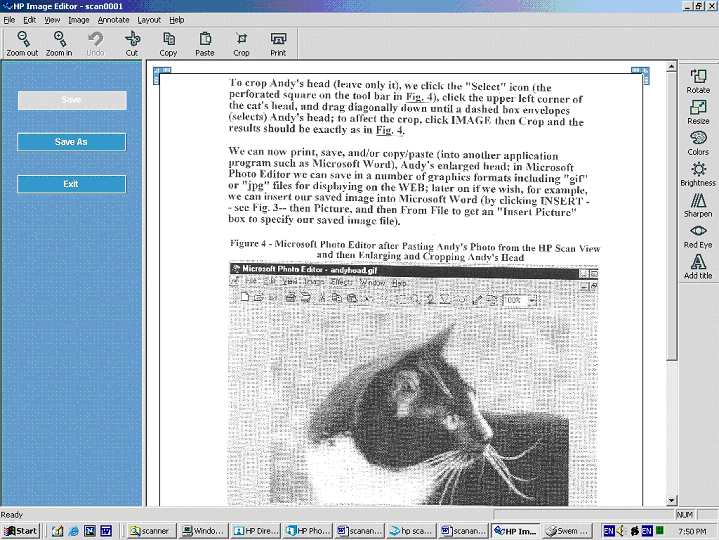
Here we discuss scanning/processing strictly images (no editable text, all text in image form); for scanning/processing editable text go to Scanning/Processing Documents below. To illustrate, we use as the source in the Scanner a page out of a former Scanner document of ours (for an older Scanner); this includes an enlargement of a cat, Andy as well as documentation text (where again here the text remains in image form, uneditable as in this example we are not interested in updating it). The objective here is to scan and store a document in the computer as image files, one page per file where the only source is a printed copy so that more copies of the document can be printed; the approach prints each image page file, one at a time; an alternative to this is to insert each image from each file in a word processor where one print prints all; this approach is streamed lined when we discuss Scanning/Processing Documents below where we scan and insert directly each page into "Microsoft Word," this is probably the easist way to print if that's all that's desired. The very fastest way is to simply click Make Copies in the "HP Director" window which does nothing but scan and print, but is not the easiest for multiple copies because you have to collate them by hand.
We start by inserting the source to scan face down in the Scanner (the source top turned to the back of the Scanner); we now click Scan Picture in the "HP Director" window (Fig. 1 above). The "Hp Scanning" box now appears (not shown), where we simply click Scan since in this box the default selection for "What are you scanning?" is "Original from glass" which is what we want, rather than the alternatives "Slides" or "Negatives.
Previewing the Scanned Image in the Hp Scanning window
The Scanner then makes a preliminary scan, showing the results in the “Hp Scanning” window for you to preview (Fig. 2 below) showing the example of Andy the cat along with documentation text; here you can optionally select a portion of the scan to accept as well as make alterations to its orientation, size, color, resolution, etc. For simplicity assume we accept the whole image, making no alterations; we now click Accept which puts the scan into whatever destination has been specified; because we are scanning strictly an image (by clicking Scan Picture in "HP Director" Fig 1), the destination is automatically a temporary "JPEG" file (if we had clicked Scan Document in Fig. 1, other destinations are possible, e.g., "Microsoft Word" which we discuss in Scanning/Processing Documents below).
Fig 2 - HP Scanning
Window
Previews the Scan, Showing Andy the Cat Plus
Documentation Text, Both in Image Form

Having clicked Accept in Fig. 2, an "Hp Scanning" message box appears (not shown , asking "Do you want to scan another image?" To keep the example simple we click No.
Note: alternately clicking Yes lets us put another source in the Scanner and THEN click New Scan in Fig. 2 to preview another scan; this would allow us to scan/preview multiple scans before final processing; another alternative with clicking Yes allows us to select a new area in the current preview and again clicking Accept in Fig. 2 accept only that portion as well as the entire image with the first accept. Again to keep the example simple we click No.
Processing the Scanned Image in the HP Photo & Imaging Gallery window
Having clicked NO in the message box, the "HP Photo & Imaging Gallery" window opens (Fig. 3); assume at this point that we have already scanned and saved the image of one page of the document and that our current example scan represents scanning the next page; this results in Fig. 3 showing two postage stamp like icons, representing in miniature two scans; the first for the first scan (in gray); the second for the current scan, selected by default (hence in blue) for further processing.
Fig 3 - HP Photo &
Imaging
Gallery Window Shows a Blue Stamp Like Icon for the Current
Scan;
the Gray Icon Represents the Scan of the Previous Page of the
Example Document
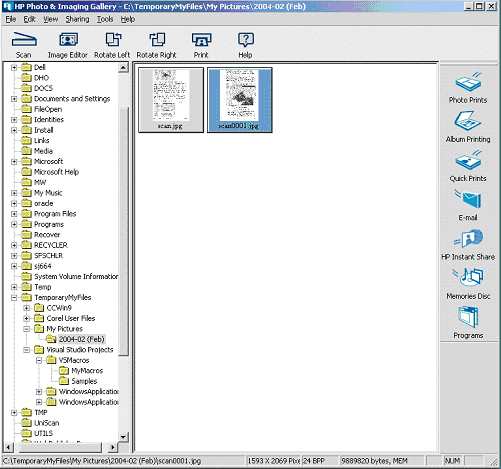
Our current scan has been saved in temp file "scan0001.jpg,"the previous in temp file "scan.jpg"; both files are located within the folder "C:\TemporaryMyFiles\My Pictures\ 2004-02(Feb)," as indicated in the left sub window in Fig. 3 (where the "C:" drive folders are shown) by the darkened "2004-02(Feb)"; this folder has been selected for displaying "JPEG"s in the "Gallery" (again in stamp like form); if you select another folder with "JPEG"s, those "JPEG"s show in the "Gallery" similarly, allowing you to process them just as you can process scans showing in the"Gallery." Thus, at this point processing is independent of the Scanner, equally available to previous image scans or to other "JPEG"images, not necessarily created by scanning.
There are basically two ways to permanently save your scanned images in the "Gallery." Using our examples in Fig. 3, the fastest way to permanently save our scans is to press "Ctrl-A" to select all, press "Ctrl-C" to copy, and then select a permanent storage area in the left sub window (e.g., "H:\" or a sub folder of "H:"); then we Press "Ctrl-V" to paste and the "JPEG"s showing in Fig. 3 copy to our selected permanent storage area (again possibly "H:\"). Note, however, that these "JPEG"s are uncompressed and that we may wish to compress them to save storage; we can do this by bringing each up in most image editors such as "Microsoft Photo Editor" and saving as "JPEG"s in compressed form; at the same time we may wish to change the file name, e.g., "scan0001.jpg" (for our current scan) to e.g., "OldScannerPage2.jpg."
The alternate way to do all this with our scans in the "Gallery" (save permanently, compress, and rename) is to bring up each into the "HP Image Editor"and save from there. To do it with our most recent scan in Fig. 3 (the blue one), we simply double click its stamp image and it opens in the "HP Image Editor" (Fig. 4.) where we can save, compress, and rename so that this may be the preferred route to save, the other (by copying and pasting the whole folder) a quick way to do it all at once.
Because there is so much overlap with what we
can do with our current example scan both in the "Gallery"
(Fig.
3 ) and the "Editor" (Fig.
4 ), we focus on the latter.
Fig 4- Hp Image Editor after Double Clicking
the
Second Example Stamp Like Image in the Gallery in Fig.
3
Processing the Scanned Image in the HP Image Editor Window
We now discuss what we can do in the Editor window with the example image of Andy the cat and the accompanying text (we have already mentioned saving but now we can go into the details); note that the text is purely image, not editable -- see Scanning/Processing Documents below for the editable text example.
We now discuss how to scan/process a document page not purely as an image but as a combination of image and editable text; again we use our Andy the cat and text example document page; this time after the scan the text part becomes editable either because it had been "Scan to" a file that supports "editable" text or directly to an opened application such as Microsoft Word; in the latter the text is immediately available for editing and is not image material like the cat as it was in our Scanning/Processing/Images discussed above.
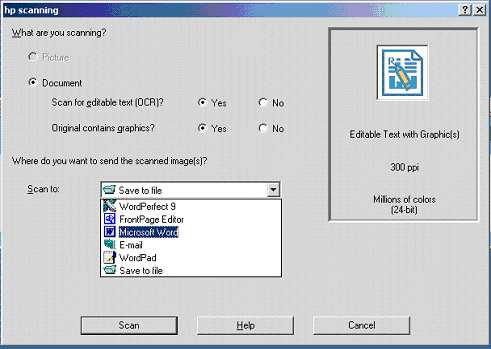
Assuming we have opened the"HP Director" window (see Getting Started above for how), we click Scan Documents. An "HP Scanning" dialog box opens (see Fig 5 below) for defining "What you are scanning?" and "Where you are scanning to?" By default we select "Yes" to the questions "Scan for editable text?" and "Original contains graphics?" In the "Scan to" pull down (again see Fig 5 ) we select "Microsoft Word". What all this will do is put the example scan into an opened session of "Microsoft Word," the text editable; the cat still an image, only editable within the limits of image editing.
Fig 5- Hp Scanning Dialog Box for Defining
What/Where
to Scan a Document Page
(results from clicking Scan
Documents in
"HP Dir" Fig.
1 )
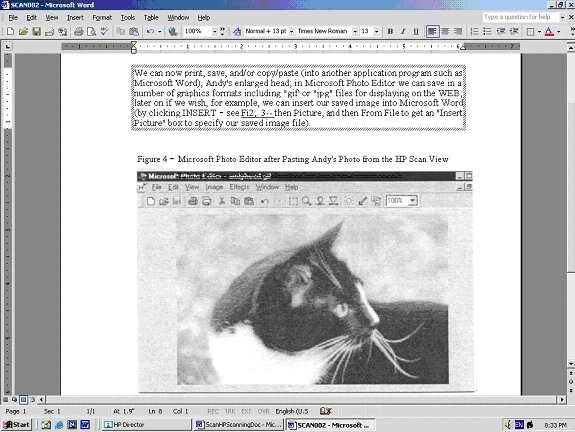
After we click Scan in Fig 5, the example text/cat image is scanned for previewing in the "HP Scanning" window as shown in Fig. 2 just as when doing strictly image scanning discussed in Previewing the Scanned Image in the Hp Scanning window above. After clicking Accept in Fig. 2, we get a "Message Box" asking "Do you want to scan another image? (again as when strickly image scanning); we click No and "Microsoft Word" opens with the text/cat scanned image showing; Fig 6 shows this after the top text has been clicked, resulting in the text being bordered by "Frames" (see gray border surrounding text, top of Fig 6); all text and image areas bounded by Frames but do not show in the display until the area is clicked. All text areas are fully editable within the Frames; although a Frame can be removed (by right clicking it's gray line, clicking Edit Frame and then Remove Frame), text formatting may be altered with Frame removed.
Fig 6- The Example Cat/Text Scan after
Acceptance
into Microsoft Word where
Frames Show about the Top Text (after being clicked), Allowing
Text
Editing
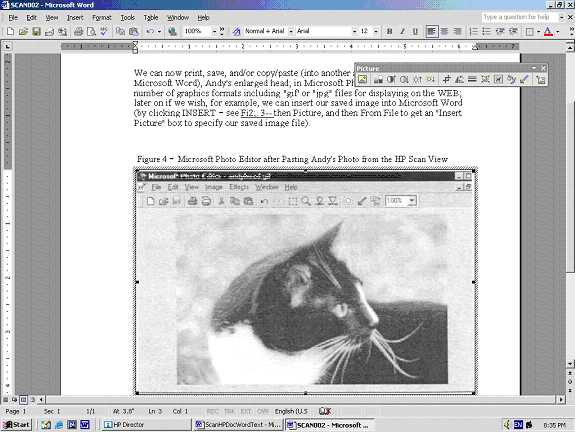
When the cat image is clicked, it too shows Frames as shown in Fig 7, but is only image editable as denoted by the Picture Tool Bar, upper right Fig 7.
Fig 7 The Example Cat/Text Scan after
Acceptance
into Microsoft Word where Frames Show
about the Cat (after being clicked), Allowing Only Image Editing
via the Tool Bar (upper right)
Here you have many choices, the simplest being saving and printing;
if you wish to save as an image type file, you can do it by copying and
pasting in an image editor such as "Paint
Shop Pro" and save from there in for example in a "JPEG" file;
beyond
that all the editing provisions that Microsoft gives you are available.
If you accept in another application such as "Word
Perfect 9," "Front Page Editor," or "Word
Pad" (these choices showing in Fig.
5 , ) the same story prevails except
that
in "Word Pad,"
there
is no "Framing"and
for
that reason the text is likely to be out of format, images sometimes
relocated.
Accepting into "E-Mail"
(again Fig.
5) is not possible
in the labs (because your E-Mail
preferences have not been setup); if you accept to a file (i.e., if
your
select Save to file
in Fig.
5), a "Save
As" box opens for you to save the file,
(instead
of an application
such as "Microsoft Word"opening).
In our example, we could have accepted multiple scans into "Microsoft Word" before processing and thus, allowed us to capture the entire example document in this application for whatever purpose -- printing, saving, editing, etc. This could have been done by clicking Yes to the question "Do you want to scan another image?" (occurring after clicking Accept in Fig. 2); then the scan would be put into "Microsoft Word" without our review, the next page scanned, and shown for preview as in Fig. 2 , Accept click again, then Yes again to "Do you want..." and so on until all scans completed; then we click No to the question, signaling scanning done, and "Microsoft Word" opens with all scanned document pages on display and we have have nailed the entire old scanning document (which who knows may be this one some day!). Again if just priniting copies of this old document (so old we didn't have a file on it and so had to scan it in), we can easily print it from "Microsoft Word," save it for another printing, or whatever, as the text is now editable.
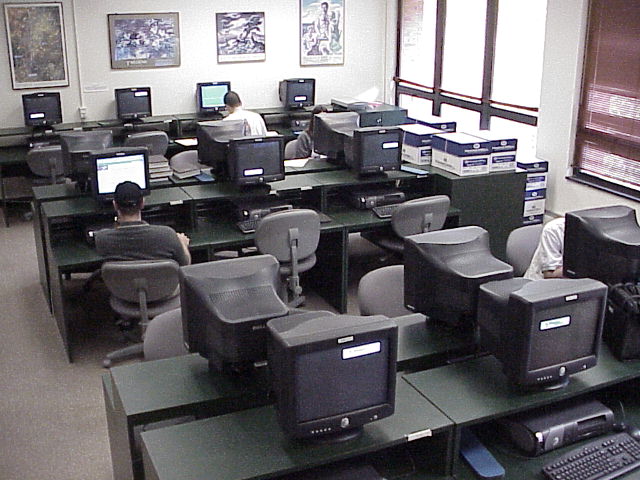
Fig 8- The New Swem Information Commons Computers where Two New Scanners Are Located
Fig 9- Marshall Wythe Law Library Lab